
Timing your cannabis harvest is one of the most important steps in the grow cycle. I’ve learned this the hard way over more than ten years of growing, cutting too early, and your buds won’t hit right- wait too long, and you lose potency or flavor. Many new growers rely on photos or vague timelines, but guessing doesn’t work.
This guide gives you the real signs to watch for when deciding to harvest. You’ll learn how to check trichomes, read pistil changes, and use reliable timing methods that I’ve tested myself in real grow rooms. No confusing terms, just steps that work.
I’ve made the mistakes already, so you don’t have to. By the end, you’ll know exactly when your buds are ready for the best results. You’ve put in the work, let’s make sure the payoff is worth it.
Recognizing When Your Cannabis Plant Is Ready for Harvest
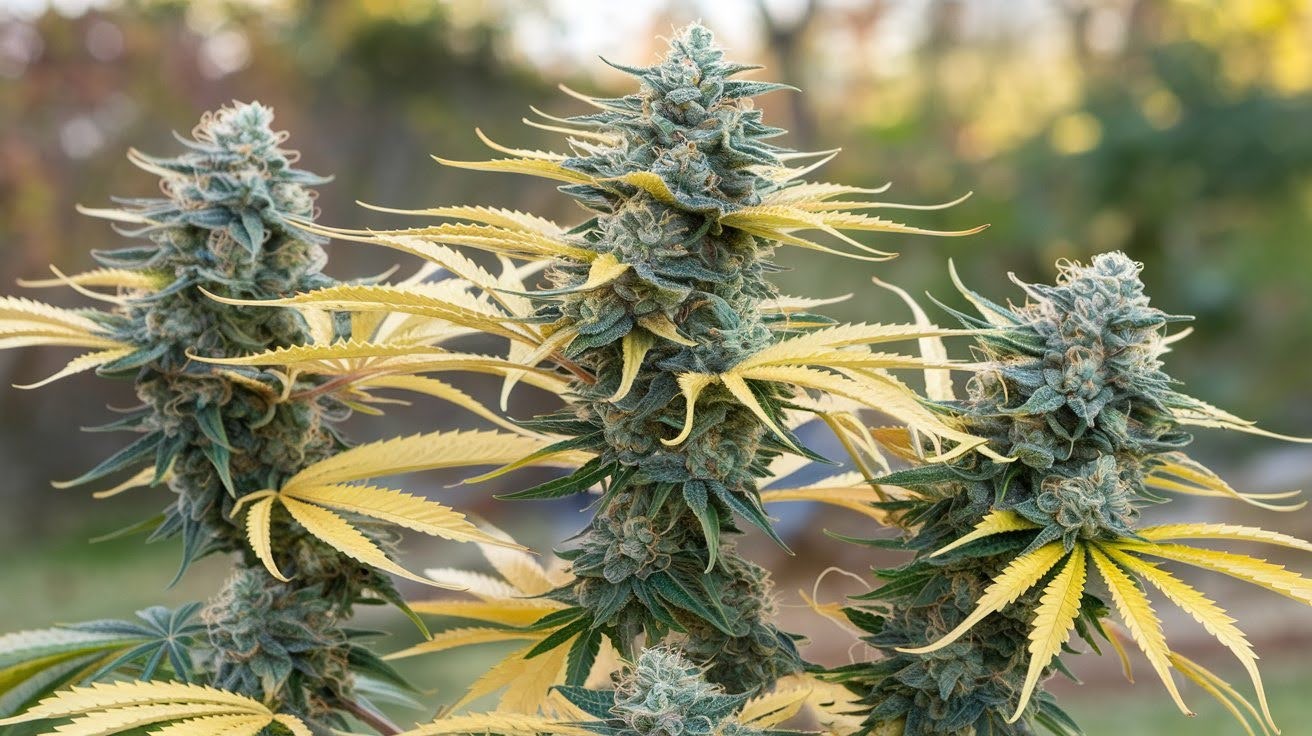
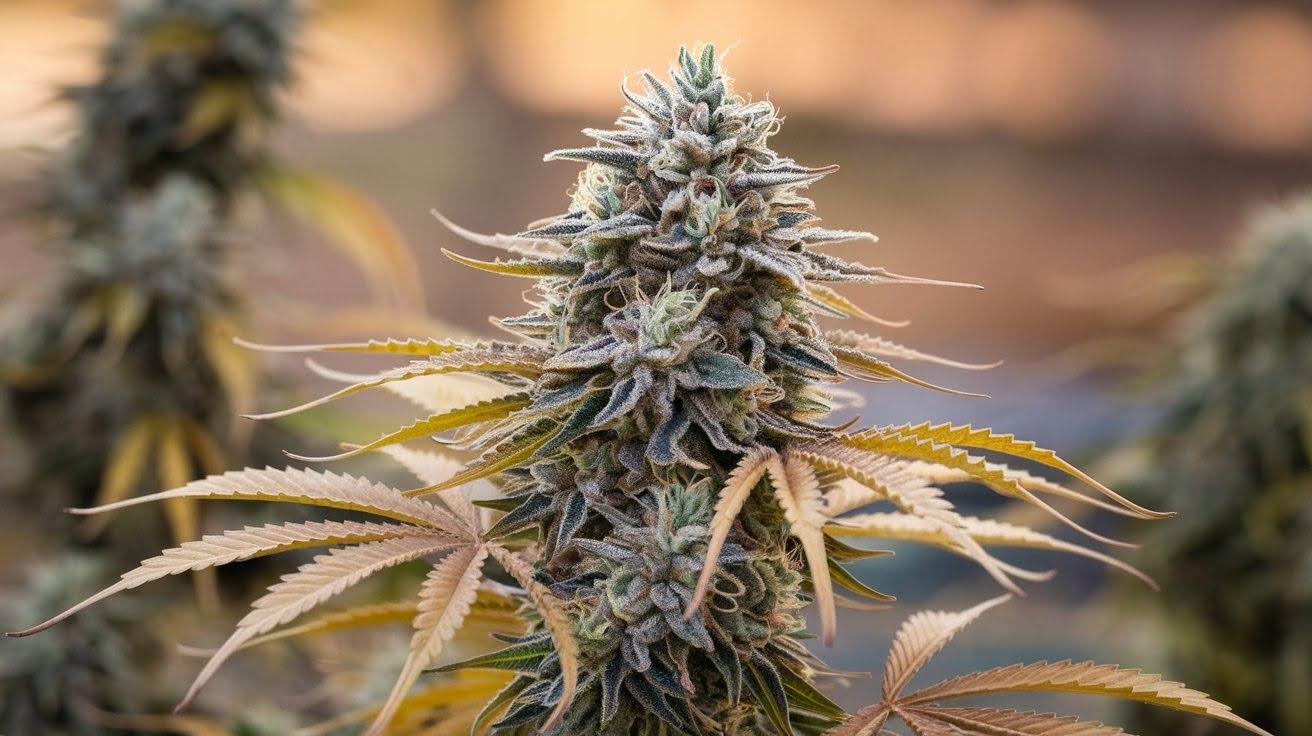
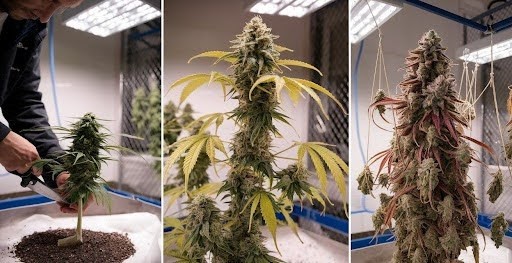
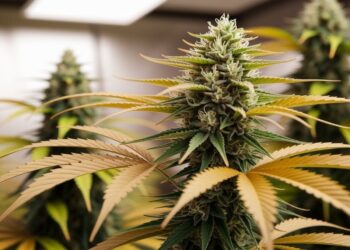
Your plant talks to you when it’s ready. You need to know what to look for. Fan leaf changes are the first sign I watch for. The big leaves start turning yellow and curling up.
This happens because the plant stops feeding them nutrients. It’s focusing all its energy on the buds instead. Don’t panic when leaves drop. This is normal.
Bud development becomes obvious, too. The calyxes swell up and look fat and full. They’re not flat anymore – they’re plump and round.
Branch weight changes dramatically. Heavy buds make the branches droop down. I’ve seen branches that couldn’t hold themselves up anymore.
Overall, the plant’s appearance shifts completely. The whole plant looks tired and ready to finish. This natural aging process is called senescence. These visual cues work together to tell you harvest time is close.
The Trichome Method – The Gold Standard for Timing
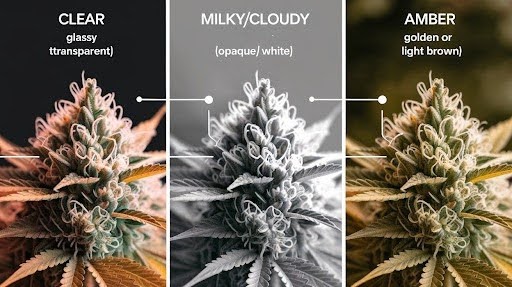
This is the most accurate way to time your harvest. I’ve used it for years, and it never fails me. What are trichomes? They’re tiny, crystal-like bumps on your buds. Think of them as little factories that make THC, CBD, and all the good stuff that gets you high.
You need the right tools to see them clearly:
- Jeweler’s loupe (60x magnification works best)
- Magnifying glass
- Smartphone microscope attachment
Here’s where it gets interesting. Trichomes change color as they mature. Clear trichomes mean your plant isn’t ready yet. The potency is low, and you might get jittery effects.
Nobody wants that. Cloudy or milky trichomes are what you’re looking for. This is peak potency time. The effects are balanced and strong. But wait – there’s more.
Amber trichomes show up when THC starts breaking down. More amber means more sleepy, couch-lock effects. Some people love this for nighttime use. The magic ratio I use is simple:
- 10% clear trichomes
- 80% milky trichomes
- 10% amber trichomes
This gives you the best of both worlds – strong potency with balanced effects. Timing your checks matters too. I start looking weekly in September for outdoor plants. Indoor plants need checking once flowering kicks in.
Pro tip: Different parts of the plant mature at different rates. Check multiple bud sites, not just one. The trichome method takes practice, but it’s worth learning. Your harvest quality will improve dramatically once you master this technique.
Stigma (Pistil) Color Changes
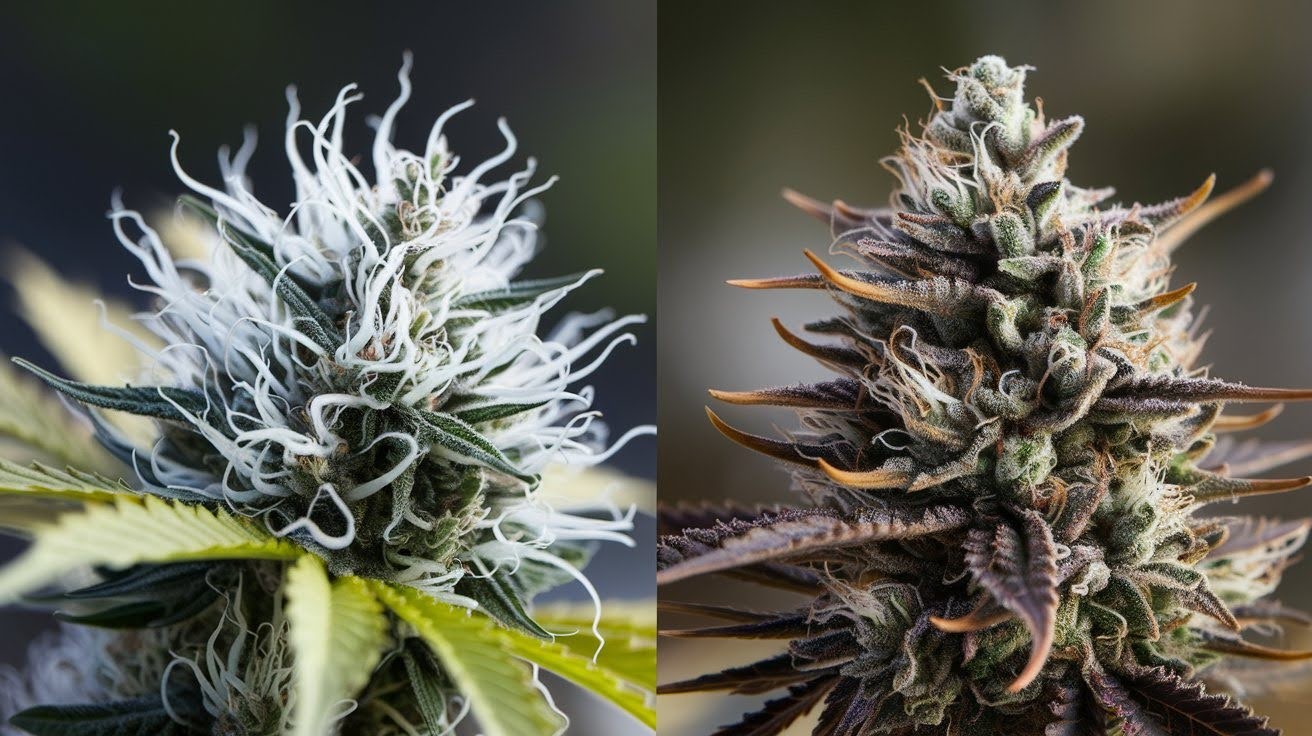
Those white hairs on your buds have a name – stigmas or pistils. They’re like little antennas sticking out everywhere. Fresh pistils are bright white and reach out from the buds. As your plant matures, it undergoes significant changes.
Ready plants show brown, dry pistils that curl back into the buds. Most of them will look dead and shriveled up. Here’s the key point: This happens right alongside trichome changes. Both systems work together to tell you that harvest time is close.
The Squish Test – A Practical Assessment Tool
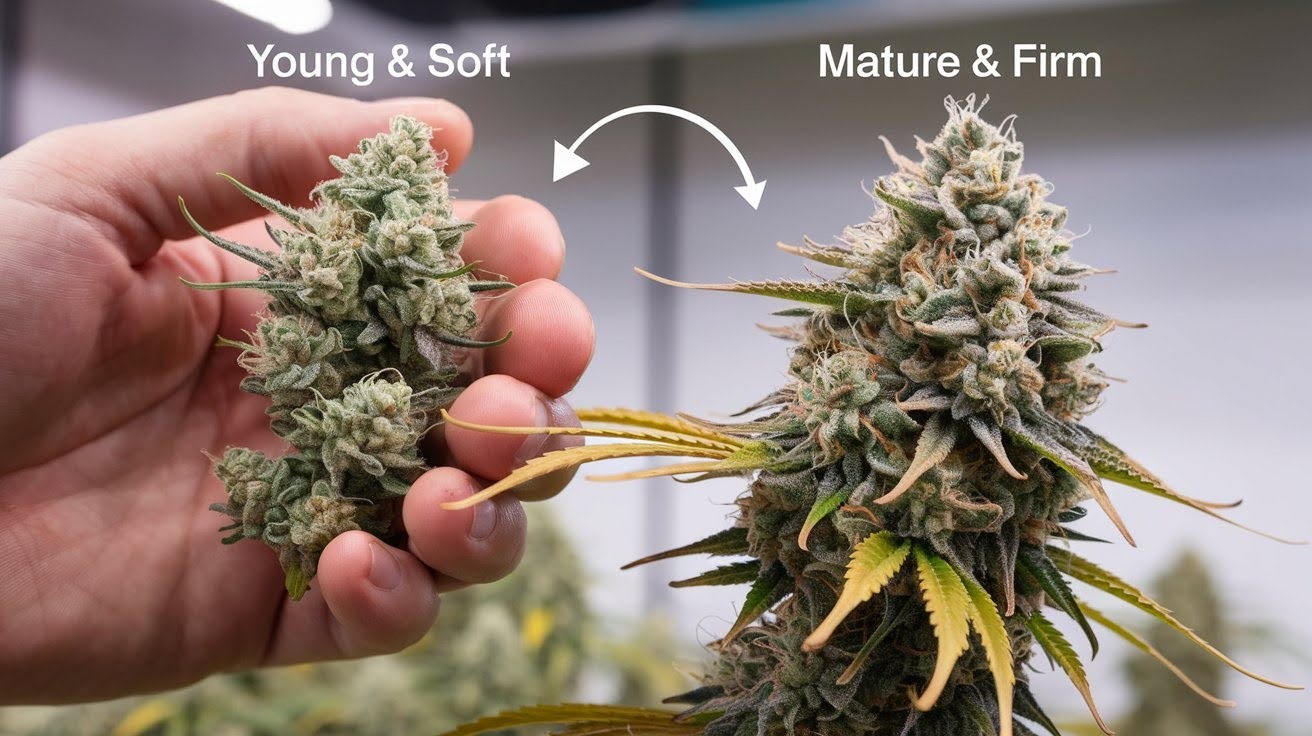
This test sounds weird, but it works. I learned it from commercial growers who use it daily.
Starting in September, gently squeeze your buds once a week. Don’t crush them – apply light pressure.
Young buds feel squishy and soft like a sponge. They’re not ready yet. Mature buds feel firm and dense when you squeeze them. They have weight and substance.
You want firm but not rock-hard. Rock-hard buds might be overdone or poorly grown. Most commercial growers swear by this method because it’s fast and reliable. No tools needed.
Strain-Specific Considerations
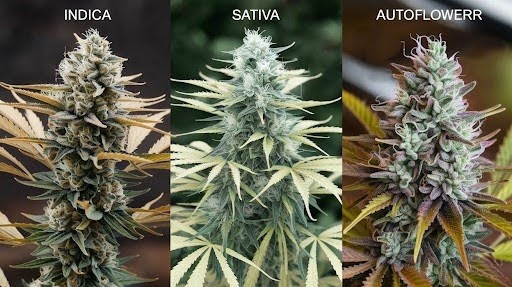
Different strains mature at different speeds. This trips up many new growers. Sativa plants take longer than indica plants. Sometimes weeks longer. Plan accordingly.
Autoflower plants are tricky. Their trichome patterns can be unpredictable. Breeder timeframes are usually wrong for autoflowers. Add two weeks to whatever they claim.
Environmental factors matter too. UV light makes trichomes develop faster. Indoor grow lights don’t always match natural sunlight. Your timing might be different from outdoor growers.
Temperature and humidity also affect how fast your plants mature. Hot, dry conditions speed things up. The bottom line: Use multiple methods together. Don’t rely on just one test. Your plants will tell you when they’re ready if you know how to listen.
Optimal Harvest Timing Strategies
Harvest timing isn’t about a perfect day-it’s about a window. Picking too early or too late can affect both quality and yield.
The Harvest Window
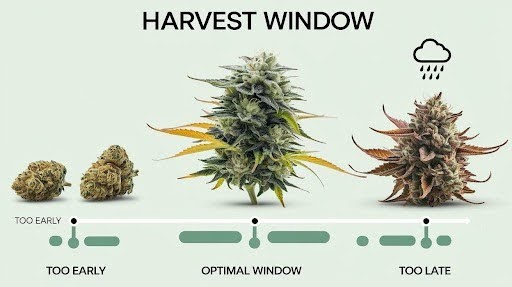
You don’t have just one perfect day to harvest. Plants give you a 1-2 week window of optimal timing. Cut too early and you lose out. Lower yields and weaker potency are the price you pay.
Wait too long and quality drops. You might get higher yields, but the smoke gets harsh and effects change. Real life gets in the way sometimes. I’ve had to harvest early because of weather or travel plans.
The key is flexibility within that window. Your plant won’t die if you’re a few days off.
Partial vs. Full Plant Harvesting
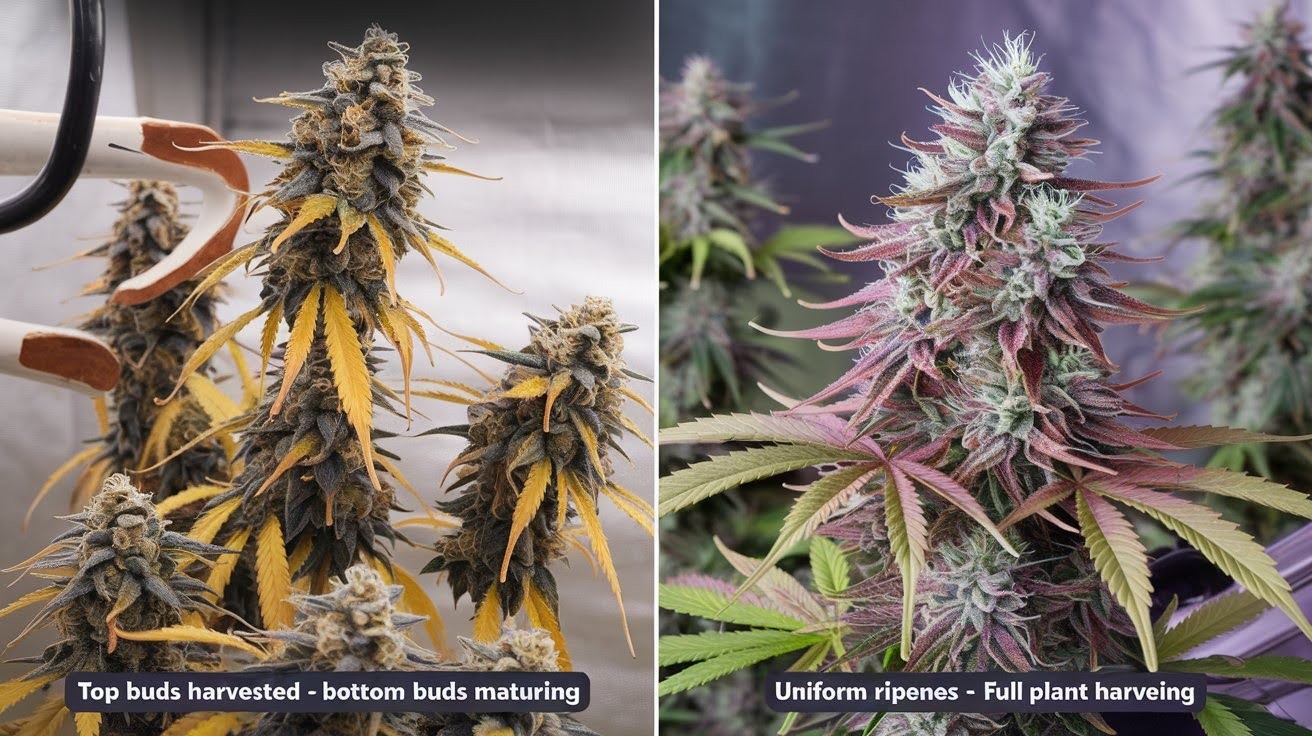
Here’s something most guides don’t tell you – you don’t have to cut everything at once. Upper branches mature first because they get more light. Top buds are usually ready before lower ones. I harvest in stages on bigger plants:
- Cut top branches when they’re ready
- Leave the lower buds for another week
- Let them fill out and mature properly
This spreads out the workload, too. Processing pounds of fresh buds in one day is exhausting. Smaller plants work better with complete harvesting. Everything matures at roughly the same time.
The sectional approach works great for medium plants. Cut the central stalk halfway up and leave the bottom half growing. Bottom buds often surprise you with how much they improve in that extra week. They get fatter and more potent.
Complete plant harvesting makes sense when everything looks uniformly ready. Don’t overcomplicate it if your plant is evenly mature. Choose the method that fits your plant and your schedule. Both approaches work well.
The Harvesting Process
Harvesting cannabis isn’t just about cutting. It’s a careful process that affects quality, potency, and how smooth your smoke feels.
Essential Tools and Equipment
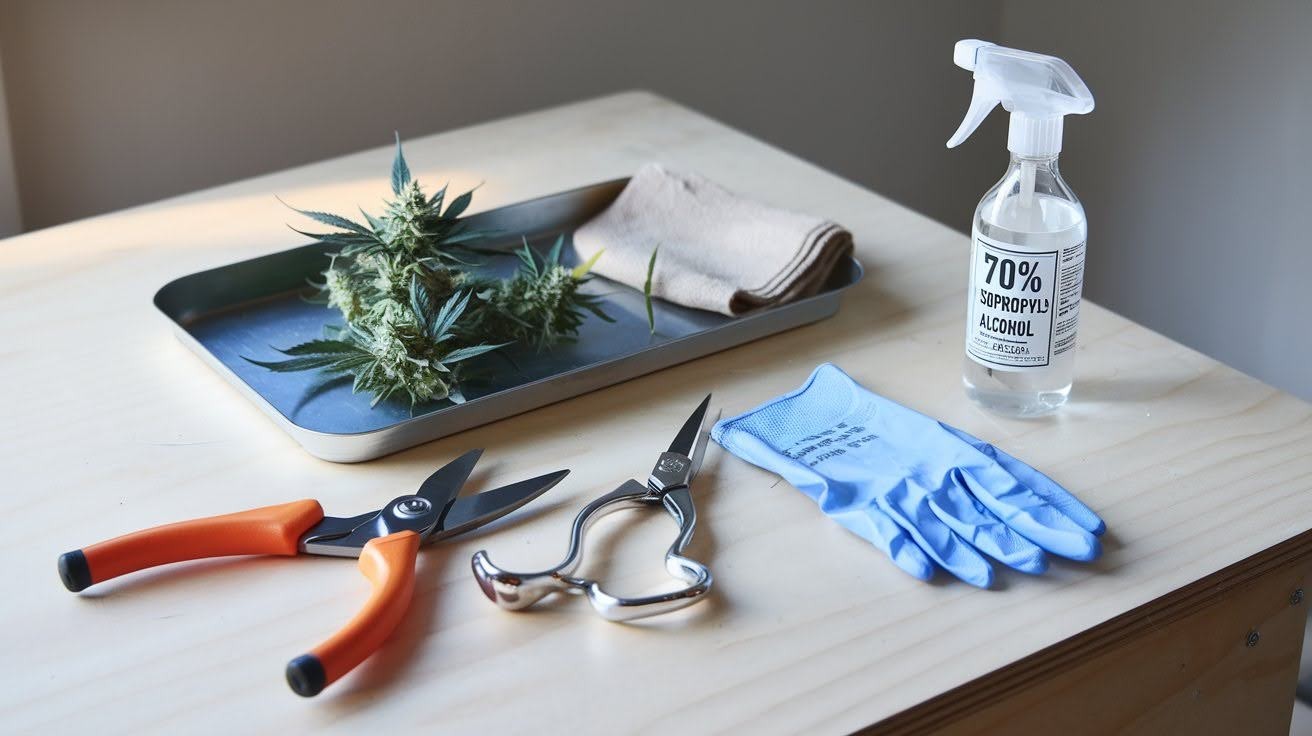
Sharp tools make everything easier. Dull scissors will crush your stems and make you work twice as hard. I recommend these brands for cutting:
- Fiskars pruning shears
- Chikamasa trimming scissors
Nitrile gloves are mandatory. Your hands will get covered in sticky resin without them. Trust me on this one. Keep 70% isopropyl alcohol handy for cleaning your tools. Resin builds up fast and gums everything up.
Set up a clean workspace before you start. You’ll need room to move and organize your branches.
Step-by-Step Harvesting Technique

Timing matters more than you think. I always harvest in the early morning before the lights come on. Why early morning? The plant has pulled moisture down to the roots overnight. Your buds will be at their driest point.
Start with the big fan leaves while the plant is still standing. Strip them off and toss them.
This saves time later during trimming.
Cut branches at natural crotches where they split. This creates “V” shapes that hang perfectly. Keep branch sizes similar for uniform drying- big branches with small ones dry at different rates.
Never touch the buds directly. Hold stems and stalks only. Your fingers will damage the trichomes. Here’s something important – leave the root system in the soil if you’re growing in living soil. Those roots feed the microbes for your next growth.
Work systematically from top to bottom. Don’t jump around randomly. Take breaks when you need them. Harvesting is physical work, and rushing leads to mistakes.
Label your branches if you’re growing multiple strains. Everything looks similar when it’s hanging. The whole process takes longer than most people expect. Plan for several hours depending on plant size.
Harvest Execution Methods
Choose your cutting method based on your plant size and maturity pattern. The whole plant method works best for smaller plants. Cut the central stalk right at soil level and you’re done.
The sectional method gives you more control. Remove the top half first, then let the bottom buds mature for another week. The branch-by-branch approach offers the most precision. I use this for large plants where different branches mature at different times.
Each method has its place depending on your situation. But here’s the critical part – speed matters after cutting. Get your branches to the drying area immediately. Please don’t leave them sitting in the sun or under hot lights.
Quality drops fast if you delay the drying process. I’ve seen people lose entire harvests by being too slow. Have your drying space ready before you start cutting. Everything should be set up and waiting.
Time is your enemy once those branches are cut.
Conclusion
You now know exactly how to harvest weed at the perfect time. No more guessing games or wasted crops. The trichome method gives you precision. Physical plant signs provide backup confirmation. And practical tests like the squish method offer real-world validation.
Your timing will improve with each harvest as you gain experience reading your plants. Remember the key points: 80% milky trichomes, brown pistils, firm buds, and yellowing fan leaves all signal readiness.
Start checking your plants weekly once flowering begins. Trust what you see, not arbitrary timelines. Got questions about your specific strain or setup? Drop a comment below – I read every one and help where I can.
Happy harvesting!
Frequently Asked Questions
How do I know when my weed plant is ready to harvest?
Check trichomes with a magnifying glass. Look for 80% milky, 10% clear, and 10% amber trichomes. Brown pistils and yellowing fan leaves confirm readiness.
What happens if I harvest weed too early?
Early harvest results in lower potency, reduced yields, and potentially racy effects. Wait until trichomes are mostly milky for optimal THC levels.
Can I harvest different parts of my plant at other times?
Yes, staged harvesting works well. Upper branches mature faster due to light exposure. Cut the tops first, then let the lower buds develop more.
What tools do I need to harvest weed properly?
Sharp pruning shears, nitrile gloves, 70% isopropyl alcohol for cleaning tools, and a magnifying glass or jeweler’s loupe for trichome inspection.
How long is the harvest window for cannabis plants?
You have a 1-2 week optimal harvest window. This flexibility allows you to time harvest around weather conditions or your schedule.


